About this blog

In this blog I'm going to show you my watercolor paintings, and also the step by step for some of them.
I'm also going to share some of my digital artwork, 3d images created and rendered in Bryce.

I will post also some of my crafty projects and some pics of the place where I live, just for fun!
Hope you'll enjoy!!!

All images published are © Marissa Gabetta

Labels

watercolor (11) watercolor painting (11) art (8) dog (8) painting (8) custom portrait (7) portrait (7) demo (6) home (6) fun (5) face (4) step by step (4) lake (3) pet (3) pets (3) view (3) paper (2) review (2) test (2) 3d (1) Ikea (1) Marilyn Monroe (1) abstract (1) brush (1) color chart (1) drawing (1) food (1) pencil (1) sewing (1) still life (1)

Monday, March 10, 2014

Chris & Lily, new custom portrait step by step

So here is my latest portrait, dad and baby daughter that show joy and love.
The challenge here was the dad, and giving him a "manly" appearance compared to the radiosity and freshness of Lily.
So here we go.....


Here I began the background, working both wet into wet and wet into dry to get texture on the tiles.


Working on the tiles, adding dry brush strokes.


I used some wax resist here and there, for texture's sake


Working glaze after glaze, I added some indian yellow for warmth, and some white to mimic the veins of the stone.


Masking fluid off the grouts, and began giving shadows.


Let's start the faces with the underpainting of aureolin yellow and indian yellow. I first wet the area and when the shine from the paper begins to disappear, I apply the pigments. Paper still wet in this photo.


3rd wash of yellows. It's beginning to have tridimensionality.
Working on the faces requires lots of patience, no rush here!


I mixed my skin tones, I will use these colors from now on, varying the amount of this or that color to get the hue I need.


This is the first glaze of skintone, I avoid the highlight areas and work with lost and found edges.


This is the alien stage.....I added some translucent orange to Lily's face to give, well, translucency.... :)


Working on the skin.....I also added some grayed down UMB to the eyes.
The gray dots you see is masking fluid, to preserve light where the droplets will be.


Beginning to shape dad's eyes, using phtalo blue and indigo.
I also started to paint his hair.


Deepened the eyes' color, and slowly building up the skin....some more color where the hair will be.


In order to work on smaller areas, in addition to the glasses I always wear, I cannot do without this magnifying glass I bought many years ago to do miniature cross stitch........that's when my sight began to get worse...


now that I've been working more on the skin and eyes, it's time to tackle the mouths....and the droplets!!!!


Still working on the skin, Lily's fine hair, shadows and lips. Did Lily's eyelashes, that must give the impression of being wet. Working on the eyebrows.


Working on hair and lips. I slightly grayed down the teeth, because leaving them white would not give a naturale effect.


More work on the hair, darkened the angles of the mouth. The contour of the hair is too harsh so I will need to work more on this.


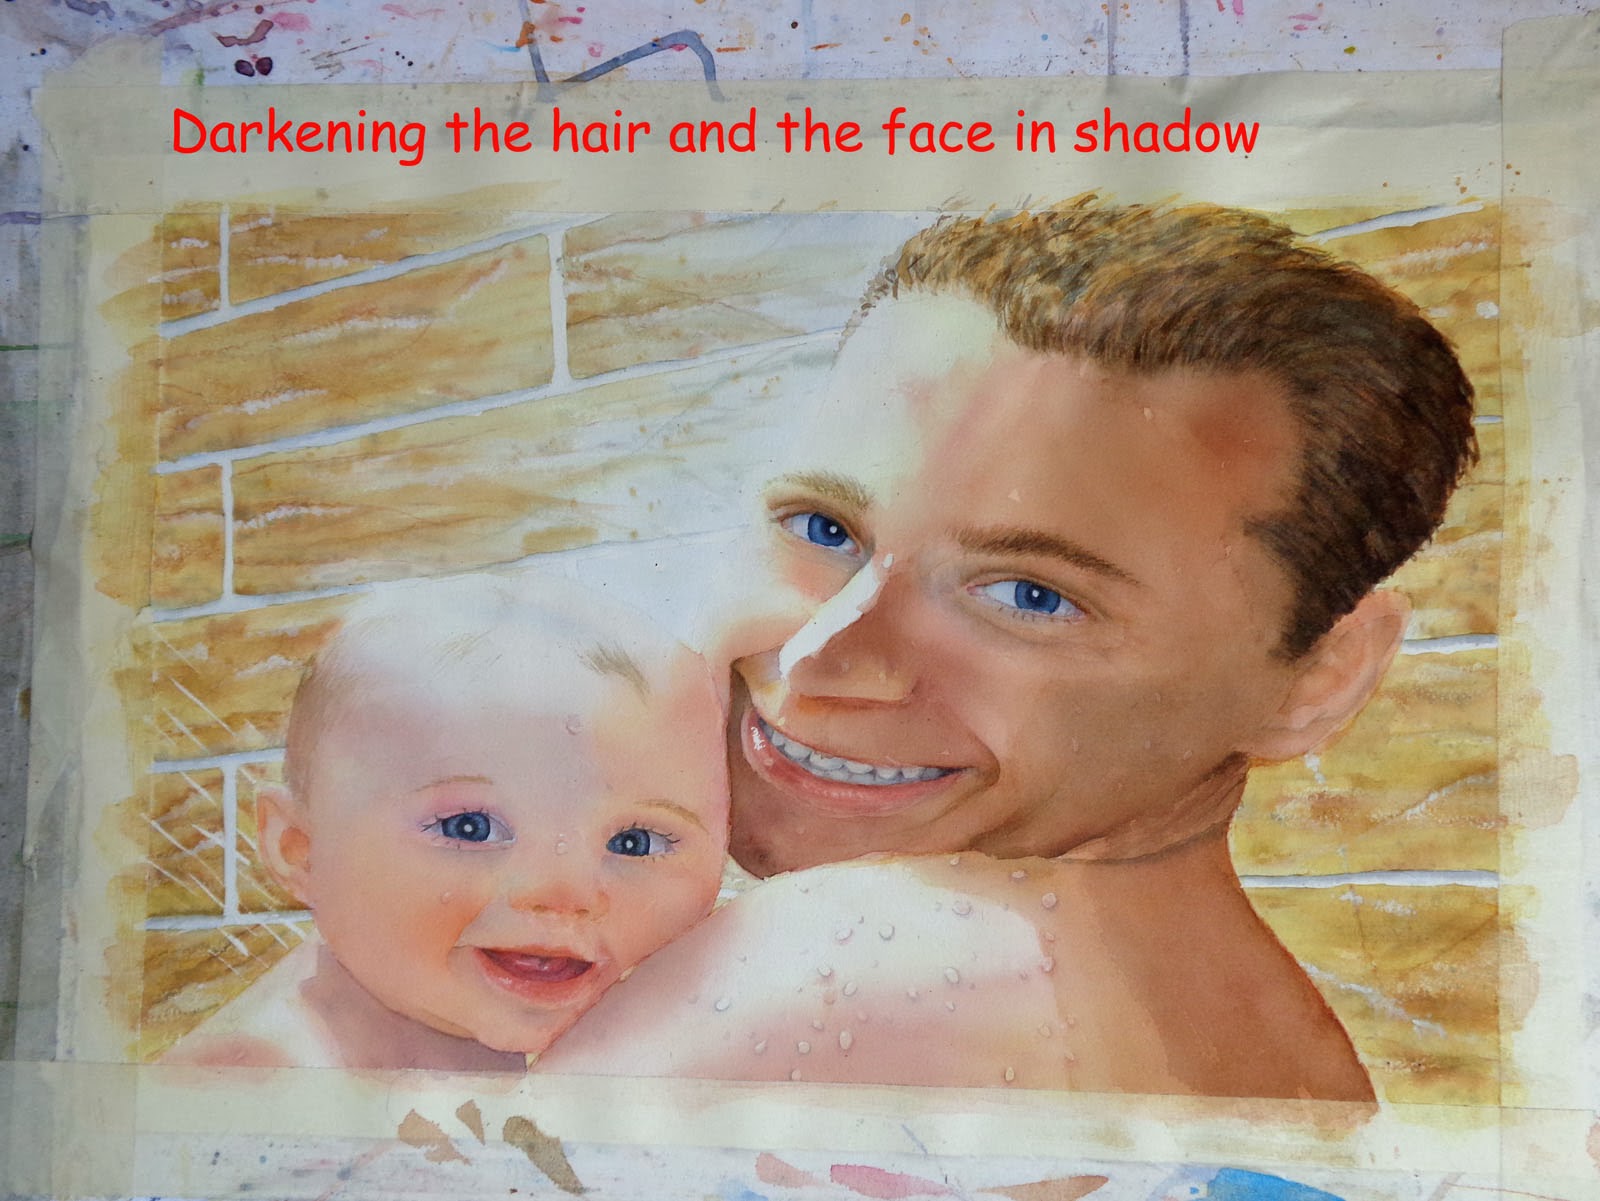
Working my way through, going darker on the shadows and on the hair.
I also gave a dark wash on the jaw, to give the impression of cut beard.


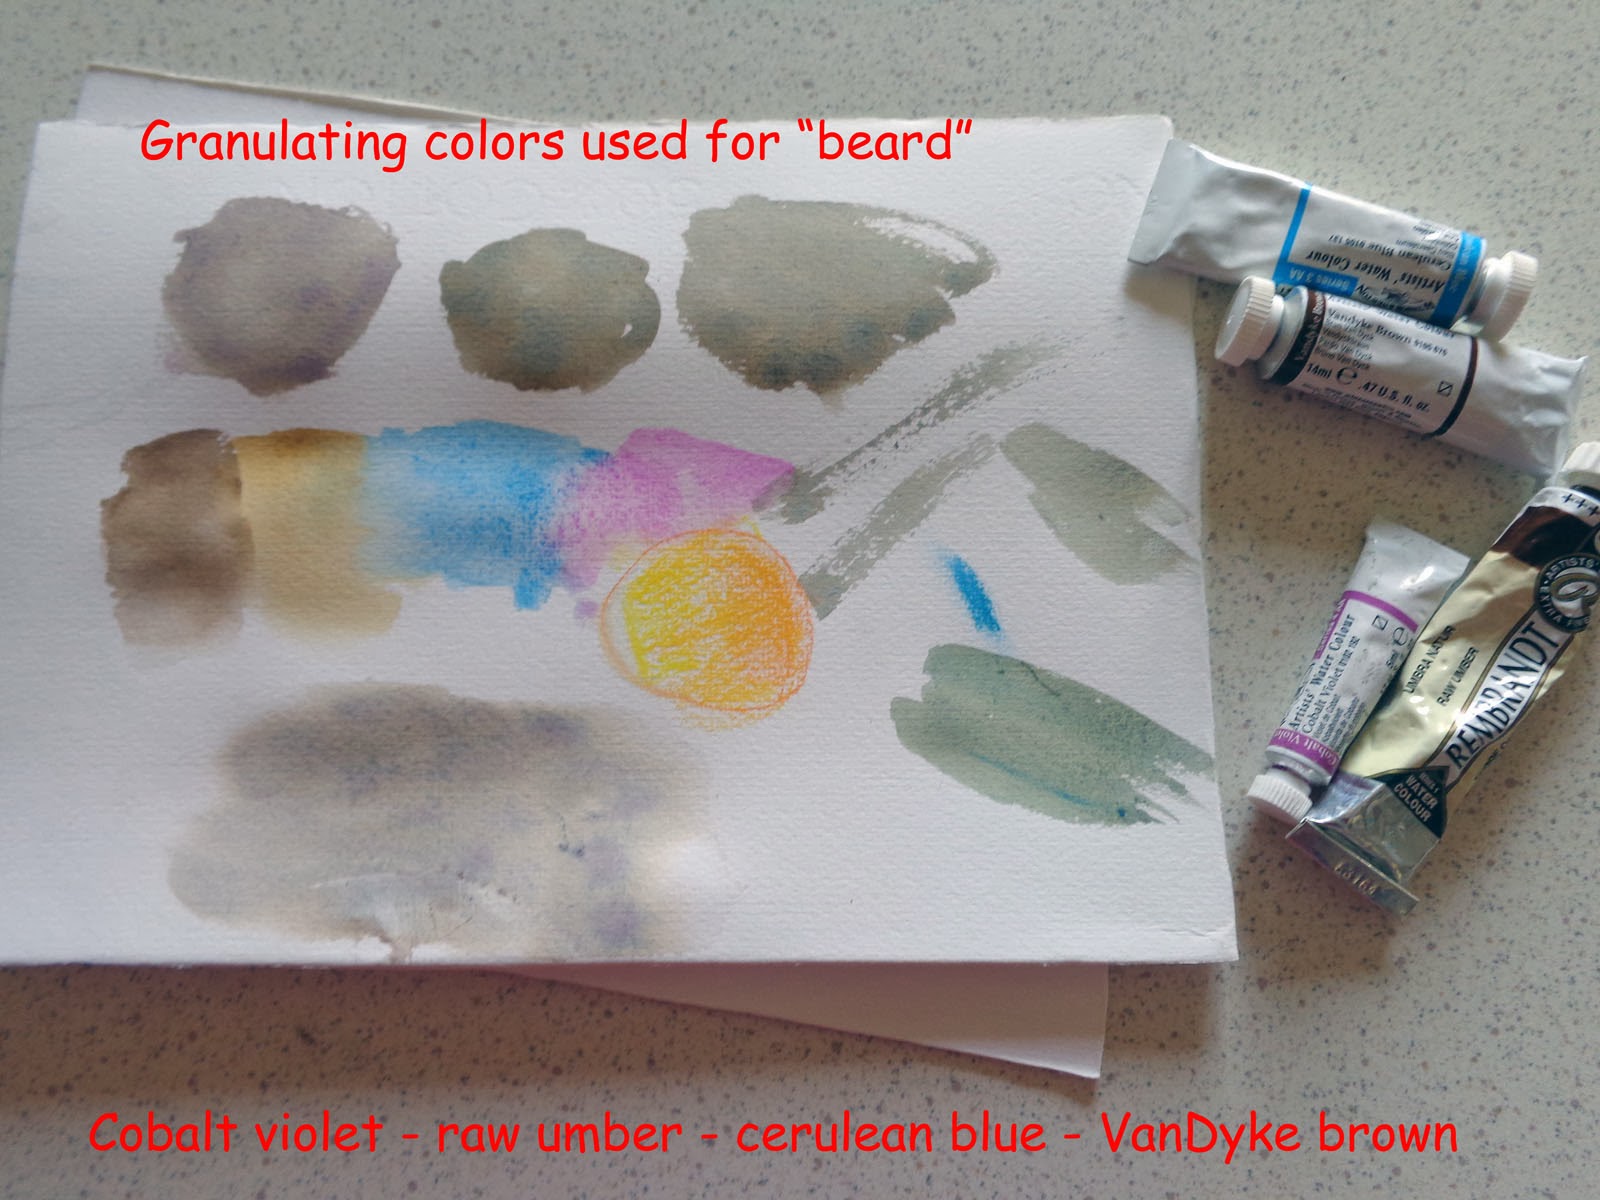
These are the colors I used for the "beard". They are mostly granulating colors, as I also need texture. In addition to this, once the color was applied to the area, I sprinkled over some fine jojoba beads in order to get even more texture.


Still working on the "beard" and hair


As the background was too similar to the skin tones, I decided to turn them greenish, to give more contrast and definition.
In order to achieve this, I glazed over them with cerulen blue, then sap green, and finally quin gold. Working on the droplets as well.


This is a particular of the skin


Now for the fun part, peeling off the masking tape..... :)


........et voilĂ !!!


Painting done!
Hope you found this demo useful.

Pin It!

Thursday, March 6, 2014

In the meantime....

I'm close to the end of the double portrait, I'm fine tuning, but I wanted to share with you a couple of pics I took this morning, it's sunny again after so much rain, and I feel so happy, I hate having to paint with artificial light!!!!


Pin It!

Saturday, March 1, 2014

Just for a change, I did a pencil drawing. It was fun, and reminded me of the times I went to school and used to draw all the time during the lessons.... :)

This is taken from a photo I took of some apples and pears, I usually love them more for decoration than for eating, so often they start to go bad and I have to rush and eat them....
So the pears in my photo were at this stage, with big brown marks on their skin, and I thought this was delightful to draw, something different from the perfect fruit you often see in still life.

So here it is


I think I will do it in watercolor as well, because I love the dramatic light and shadows in the photo!


Now off to prepare a new custom portrait, it's a double portrait, dad and baby daughter under the shower.
Yes, baby Lily again, and I will share the process with you.
The challenge here is to paint a man's face, we'll see.... :)

Pin It!

Wednesday, February 19, 2014

Paper

I started using Fabriano, it's a very good paper, it's italian so easy to get here in Italy, then I started using Arches, I prefer it, and it's way cheaper, I usually order it at Cheap Joe's.
It seems unbelievable, but here a sheet of watercolor paper (Fabriano) costs € 12 while 1 sheet of Arches (I bought a 25 pack) cost me about $ 3.86, plus shipping and customs clearance, which is certainly waay less expensive than the italian price.
This extends to all materials, brushes and colors (I cannot find Schmincke in Como, so have to order online anyway).

Yesterday I ordered from Garzapapel in Spain some handmade watercolor paper.
They have a trial offer with FREE samples and FREE shipment all over the world.

Garzapapel

It sure looks interesting, looking forward to it. It is quite a pricey paper, but don't want to miss the opportunity to try it out!
I will let you know as sson as it arrives.


Pin It!

Wednesday, February 12, 2014

A baby portrait step by step - Sweet Lily

This is my latest commission, I already had made a portrait for Anne-Marie when she had her first child, now a baby girl arrived, and she kindly asked me to  make a portrait for little Lily.
So here I am, showing you the step by step process. The painting is made on half a sheet of Arches 300grs and used mainly Schminke transparent watercolors.

So here we go....

Step 1

These are the colors I chose for the background, W&N Antwerp blue and Schminke purple magenta.
Plan ahead and have all your stuff ready, prepare your colors in bigger quantities than you think you will need. It is a drama if in the middle of the painting you run out of color and have to mix more.....


The small brush with the opened up point is a very old brush I used 30+ years ago to paint on porcelain.
NEVER throw away old worn out brushes, they may be very useful for particular effects, I use this one especially for hair, eyelashes and eyebrows, it's just perfect!


So here is the first glaze on the background, wet on wet, I don't want it to be uniform, it would be boring, and in the ref. photo the baby is laying on a cotton towel, maybe mommy just changed her diaper, that's why she's smiling.......
I masked some hair on the front, the highlight on her right eye and on the tip of her nose. the paper is mounted on a gator board with masking tape that will also provide a nice edge to the painting.


Here is the second glaze on the background, this is a baby portrait, so color must be built up very slowly, no harsh changes of colors, I did some splattering when still wet.
I did the underpainting of the shirt using a cool yellow (aureolin) and a warm one ( indian yellow).


I used the same yellows to do the baby face underpainting, wet on wet (you may see the paper is still buckling in the photo).
To me, making the underpainting in (very diluted) yellows helps to give life to the colors that will be layered later.
Aureolin for the part of the face in light, and indian for the shadow areas.


I began working on the shirt, wet on wet. The sirt reflected here and there the skin colors, this is why I put a pinkish color on a white shirt.
And to me white is never "white"......


With the second glaze on her face, I began to give a "tridimensional" look, to shape it


The first layer of skintone: this will be used in all the following steps, varying the quantities of this or that color. Keep in mind that this is a baby with pale skin, so no harsh colors.
Anyways the colors I used here are: purple magenta, ultramarine finest and translucent orange, all by Schmincke.
I also mixed up some alizarin crimson and phtalo green (not blue, it was a typo)  to get a grayish color and painted the whole eyes with it.
At this stage poor Lily looks like a baby alien, but it will come together....


One more layer on the backgound, and some more working on the face.


More work on the face and the eyes where I used some toned down UMB for the pupils amd irises.


Still working on the face.....began painting the nostrils, which cannot be too dark, and on the lips, which are very challenging because they must not end up like she's wearing a lipstick, but they are naturally very pinkish


Slowly defining the details and the shadows........


Glaze over glaze, it is coming together. This is the slow part, as the paper must be bone-dry before applying the next glaze, and I don't use a hairdryer as I don't want to move the color on the paper....working more on the eyes, where I added some W&N blue green shade and indigo.


.....slow but steady progress.....


Been working more on the fine hair, lips eyes and "wrinkles".
Added a very diluted ruby red wash to her cheeks and tip of the nose.
Working very carefully on the lips.....


Nearly there...... :)
I removed the masking fluid and worked some more on the eye creases and the lips.
I also added some W&N blue green shade to the background to the left of her face


Done!!!!!
I'm very happy with the result, now for the part I like the most.....


.....removing the masking tape from the painting! :D


So here she is, Lily in all her beauty!!!


Hope you enjoyed this step by step and found it useful, pls let me know!!!

Pin It!

Tuesday, February 4, 2014

Color charts

One of the things I treasure are these lists I made of the colors I have. They come in handy very often if, let's say, I need a non staining color for my composition.
I took the time to write down all the characteristics of each one: lightfastness, transparence/opacity, pigment code, staining or not, granulosity if any, and if they are cool of warm.
They may not be perfect, but they are absolutely worth the time!!!


One more thing I did was this chart where I put the yellows/blues combinations to have a handy guide for mixing greens; this is also very useful and saves you much time when mixing colors, and pleasant greens are the most difficult colors to get, so at a first glance I can get an idea of what I need, without spending lots of time (and of colors) trying to get what I need.


I did the same with purples (purple is my fav color)

On my to-do list is a chart for grays..........

I also did a sample for water resists, to see how they behave....the last one is wax crayon, I forgot to add


So take your time, take your colors and do your charts....and have fun!


Pin It!

Saturday, February 1, 2014

Candle in the wind - A step by step

Here is a step by step of my painting dedicated to Marilyn Monroe.


I started by making a wash with clean water all over, a light wash of aureolin all over then:1: rewet the face area (but the eyes and mouth) and put a wash of aureolin Yellow


2:Let it dry then rewet and added some indian yellow to add depth


3:did the same with the neck, let it dry and put a light wash of indian yellow+alizarin crimson+ a tad of phtalo blue. Played with different quantities of these colors to add shadows to the shoulder area and to the right side of the face.


4:As I found it to be a little bit too yellow, I rewet all the skin area and applied a very faint wash of alizarin crimson


5: I masked the highlights in the eyes, mouth and earrings  and began working on the irises wetting them and putting some purple magenta and umb, as from the ref photo I saw a lot of purple and violet, and on the eyelids, putting some very pale violet hues there too.
I made a 1st wash for the neck shadow playing with alizarin, yellow and blue until I got the brown hue I liked. I also worked a bit more on light and shadows on the face, lifting where needed and trying to smooth things a bit


6:added a purple shadow on the left of her face that I quite didn't like, so this step was mainly lifting off and smoothing and darkening the shadow areas. I worked on the eyeliner, putting a reddish violet on the exterior side of the eyes blended into brown towards the inner part. Put a very light wash of umb on the white part of the eyes. added some aureolin yellow to the hair


7:Added some indian yellow to the hair. A clear water wash on the background, playing with hues of blue, pink violet and Winsor blue. Deepened the neck shadow and played more with the skin tones, added some brown mixed as above (on the cold side) for the eyeshadow and put a first wash of translucent orange on the lips


8:Worked more on the eyes adding the pupil and outer "ring" with indigo. Still worked on the skin, lifting highlights. Put a wash of scarlet red on the lips


9:worked more on skin and makeup.


10:Went wild with the background, I wanted a deep rich color that matched her eyes, so I put mixes of umb, winsor blue, winsor violet and stokes of Payne's gray over the color here and there. Refined the lips adding more scarlet red, purple magenta and quin gold on the lips to achieve a very rich warm red. added eyelashes with a very dark mix of blues and brown. Began the teeth gums with some translucent orange and alizarin crimson. Began working on the earrings with quin gold and indigo and brown.


11: Final painting. defined eyebrows, finished the mouth and teeth and painted the hair using cold (on the greenish side)and warm browns, adding some translucent orange to some of the sunlit areas and some quin gold where I felt hair needed more glow.


Pin It!